<?xml version="1.0" encoding="utf-8"?><feed xmlns="http://www.w3.org/2005/Atom" ><generator uri="https://jekyllrb.com/" version="4.4.1">Jekyll</generator><link href="https://www.davidguida.net/feed.xml" rel="self" type="application/atom+xml" /><link href="https://www.davidguida.net/" rel="alternate" type="text/html" /><updated>2026-01-08T15:02:42+00:00</updated><id>https://www.davidguida.net/feed.xml</id><title type="html">David Guida</title><subtitle>A little bit of software architecture, design patterns and game programming. Focusing on .NET Core, ASP.NET, C#, Blazor, Azure.
</subtitle><author><name>David Guida</name></author><entry><title type="html">Vibecoding and the art of solving my wife’s problems</title><link href="https://www.davidguida.net/vibecoding-wife-problems" rel="alternate" type="text/html" title="Vibecoding and the art of solving my wife’s problems" /><published>2025-11-22T05:57:23+00:00</published><updated>2025-11-22T05:57:23+00:00</updated><id>https://www.davidguida.net/vibecoding-wife-problems</id><content type="html" xml:base="https://www.davidguida.net/vibecoding-wife-problems"><![CDATA[<p>So, my wife had a problem. And of course, trying to be a good husband, I made that <em>my</em> problem.</p>

<p>What was the problem then and why am I blogging about it now? Well, that’s pretty simple. She decided to download a copy of all her photos from Google Photos, but soon discovered that all the nice EXIF metadata were not there anymore. Pretty inconvenient, isn’t it?</p>

<p>Searching around, turns out that using another tool, Google Takeout, you can download your media files, along with their metadata stored in a separate .json file.</p>

<p>Now, with a couple of photos, this wouldn’t be an issue. But of course that was not my wife’s case, as she had almost 2 decades worth of pictures stored there.</p>

<p>“Wait a second, I can code something for you!”, I said.</p>

<p>Now, if you know me, you know that I am <em>quite lazy</em>. And I wanted to come up with a solution very quickly. So what did I do? Well, that’s simple: I vibecoded everything (almost). And guess what: it was working decently fine, at least enough to make my wife happy (which makes me happy as well, as you may guess). As usual, I’ve put the code in a git repo, in case anyone else has the same problem: <a href="https://github.com/mizrael/media-exif">https://github.com/mizrael/media-exif</a>.</p>

<p>Now, why am I even writing about this? Good question. Let me go a bit back in time.</p>

<p>I wrote my first line of code around 1988 (gosh, I feel old only typing it). 
Since then, if something sparked my curiosity, I have always tried to figure out how it worked and if I could write it myself (especially videogames).</p>

<p>All of this just to say that I love coding. I enjoy the act of creation and the thrill I get when I see pixels on the screens doing what I asked the computer to do.</p>

<p>Vibecoding this small tool for my wife almost felt like asking somebody else to do the “dirty job” for me. The result worked, but the process took away the pleasure from me. In a way, it still had some charm though: in my mind I was playing this twisted game of golf where I was trying to get to a working solution in the least amount of prompts.</p>

<p>Does that mean that vibecoding is bad and I won’t be doing it anymore? No. But I am definitely using it very sparingly and consciously, like a surgeon.</p>

<p>Like most software engineers, I am paid to solve problems. The faster I solve them, the quicker I can move to the next one, then the next one and so on. The more problems I solve, more money the company makes, and I get to keep my job (hopefully with some nice bonuses too).</p>

<p>I’ve been in this game long enough, which helps me understand AI-generated code most of the times. This is definitely helping me, but I would never, ever, vibecode stuff and put it on prod.</p>

<p>At work I might be vibecoding a prototype, <strong>throwaway code</strong> that I would use only to test an idea and then delete. Helps me iterate quickly and get to the point faster.</p>

<p>Vibecoding is a great tool, but it’s not there yet. Most of the times the resulting code is too complex, too convoluted and needs a lot of refinement.</p>

<p>I also still want to have a certain level of control on the code, 
and if I have an AI produce it and then I have to fix it, it would completely defy the purpose.</p>

<p>There’s also another aspect to it. As I wrote before, I can read code written by others (AI or humans, doesn’t matter), and with enough time, make sense of it. This ability came after years and years of practice.</p>

<p>If you’re starting now to code and all you do is write prompts, then you’re doing it wrong. You’re not learning anything, so just stop and perhaps reconsider your life choices.</p>]]></content><author><name>David Guida</name></author><category term="AI" /><category term="Ranting" /><category term="Tools" /><summary type="html"><![CDATA[Is vibecoding with AI a productivity boost or a shortcut that removes the joy of coding? My experience solving my wife's photo metadata problem and what it taught me about AI-assisted development.]]></summary><media:thumbnail xmlns:media="http://search.yahoo.com/mrss/" url="https://www.davidguida.net/assets/uploads/2025/11/vibecoding-wife-problems.jpg" /><media:content medium="image" url="https://www.davidguida.net/assets/uploads/2025/11/vibecoding-wife-problems.jpg" xmlns:media="http://search.yahoo.com/mrss/" /></entry><entry><title type="html">Is AI stealing my job?</title><link href="https://www.davidguida.net/is-ai-stealing-my-job" rel="alternate" type="text/html" title="Is AI stealing my job?" /><published>2025-05-21T05:57:23+00:00</published><updated>2025-05-21T05:57:23+00:00</updated><id>https://www.davidguida.net/is-ai-stealing-my-job</id><content type="html" xml:base="https://www.davidguida.net/is-ai-stealing-my-job"><![CDATA[<p>TL;DR; No.</p>

<p>Let me say it clearly, and let me say it loudly: AI is not going to replace software engineers.</p>

<p>Let that sink in.</p>

<p>Now, understand this: our job is changing. The way we write code is evolving. What’s happening right now is a true singularity event. Anyone who denies this will be left behind.</p>

<p>If you think about it, the act of creating software can be divided into three main parts:</p>

<ol>
  <li>Ideation</li>
  <li>Execution</li>
  <li>Assessment</li>
</ol>

<p>Let’s go through them one by one.</p>

<h3 id="ideation">Ideation</h3>
<p>This, to me, is the most fundamental—and the most fun—part. <strong>It’s where dragons lie</strong>. It’s the realm of architects and designers. This is where you (or your customers) come up with an idea and begin shaping its architecture, the underlying algorithms, and all the moving parts.</p>

<h3 id="execution">Execution</h3>
<p>Next comes <em>Execution</em>. It’s quite literally a byproduct of the Ideation phase—you can’t execute without a plan. This is where ideas take shape in code. It’s about translating architecture into implementation, turning abstract concepts into working systems.</p>

<h3 id="assessment">Assessment</h3>
<p>Last, but definitely not least, we have Assessment. This is where you test what you’ve built, check for errors, and make sure you’ve met your <em>definition of done</em>.</p>

<h4 id="then-what-you-rinse-and-repeat">Then what? You rinse and repeat.</h4>

<p>You’ll notice this pattern—Ideation → Execution → Assessment—repeats at every level, across every stage, with varying degrees of depth.</p>

<p>Now, let’s circle back to the original question:
Is AI going to steal our jobs?</p>

<p>Think about it—what do we use coding assistants for right now?</p>

<h4 id="execution-1">Execution.</h4>

<p>We <strong>need</strong> humans to come up with ideas.<br />
We <strong>need</strong> humans to define the architecture.<br />
We <strong>need</strong> humans to write the specs.<br />
We <strong>need</strong> humans to check the output and ensure the application works as intended.</p>

<p>Now, replace <em>humans</em> with <em>software engineers</em> in most of those steps—if not all, depending on what you’re building.</p>

<p>Am I 100% sure of everything I just said? No. I believe the full shift isn’t happening <em>now</em>, and it will take several years before we reach that point. But even then, we’ll simply have a new definition of what it means to be a software engineer.</p>

<p>Imagine you had a time machine and traveled back to, say, 1979. You bring your laptop and show Visual Studio to a programmer from that era.
I bet some of them would quit their jobs and open a bakery. They’d look at tools like <em>IntelliSense</em>, <em>JIT</em>, and <em>Garbage Collection</em> and think, “Well, I’m obsolete.”</p>

<p>Now ask yourself:<br />
Aren’t you taking those tools for granted today?<br />
Do you still feel like quitting your job?</p>]]></content><author><name>David Guida</name></author><category term="AI" /><category term="Ranting" /><summary type="html"><![CDATA[Is it happening? Do I have to quit my job and open a bakery instead?]]></summary><media:thumbnail xmlns:media="http://search.yahoo.com/mrss/" url="https://www.davidguida.net/assets/uploads/2025/05/is-ai-stealing-my-job.jpg" /><media:content medium="image" url="https://www.davidguida.net/assets/uploads/2025/05/is-ai-stealing-my-job.jpg" xmlns:media="http://search.yahoo.com/mrss/" /></entry><entry><title type="html">How to set the SKU of an Azure SQL Server using Aspire</title><link href="https://www.davidguida.net/aspire-azure-sql-server-sku" rel="alternate" type="text/html" title="How to set the SKU of an Azure SQL Server using Aspire" /><published>2025-03-20T05:57:23+00:00</published><updated>2025-03-20T05:57:23+00:00</updated><id>https://www.davidguida.net/aspire-azure-sql-server-sku</id><content type="html" xml:base="https://www.davidguida.net/aspire-azure-sql-server-sku"><![CDATA[<p>I recently started using Aspire out of curiosity, and I immediately fell in love with it. Once you’ve grasped the main idea, assembling and provisioning applications becomes a breeze!</p>

<p>I am currently using it to deploy <a href="/riverdam-feature-gates-finally-made-easy">Riverdam</a>, and I will be using it for all my other Azure projects from now on, for sure.</p>

<p>One of the things that took me a bit to figure out was how to select the SKU for a SQL Server instance. It is not super straightforward (at least not as of today), so I figured it was a good idea to write this post in case anyone else is looking for a solution.</p>

<p>Enough talking, let’s get to the code:</p>

<div class="language-csharp highlighter-rouge"><div class="highlight"><pre class="highlight"><code><span class="kt">var</span> <span class="n">db</span> <span class="p">=</span> <span class="n">builder</span><span class="p">.</span><span class="nf">AddAzureSqlServer</span><span class="p">(</span><span class="s">"sql"</span><span class="p">)</span>
        <span class="p">.</span><span class="nf">ConfigureInfrastructure</span><span class="p">(</span><span class="n">infra</span> <span class="p">=&gt;</span>
        <span class="p">{</span>
          <span class="kt">var</span> <span class="n">resources</span> <span class="p">=</span> <span class="n">infra</span><span class="p">.</span><span class="nf">GetProvisionableResources</span><span class="p">();</span>

          <span class="kt">var</span> <span class="n">dbRes</span> <span class="p">=</span> <span class="n">resources</span><span class="p">.</span><span class="n">OfType</span><span class="p">&lt;</span><span class="n">SqlDatabase</span><span class="p">&gt;().</span><span class="nf">Single</span><span class="p">();</span>
          <span class="n">dbRes</span><span class="p">.</span><span class="n">Sku</span> <span class="p">=</span> <span class="k">new</span> <span class="nf">SqlSku</span><span class="p">()</span>
          <span class="p">{</span>
              <span class="n">Tier</span> <span class="p">=</span> <span class="s">"Basic"</span><span class="p">,</span>
              <span class="n">Name</span> <span class="p">=</span> <span class="s">"Basic"</span><span class="p">,</span>
          <span class="p">};</span>
        <span class="p">}).</span><span class="nf">AddDatabase</span><span class="p">(</span><span class="s">"MyDatabase"</span><span class="p">);</span>
</code></pre></div></div>

<p>Luckily it’s not a lot of code, so I guess there’s no real need for an explanation. Enjoy!</p>]]></content><author><name>David Guida</name></author><category term="Aspire" /><category term="Azure" /><category term="SQL Server" /><summary type="html"><![CDATA[In this article we'll see how to select the SKU of an Azure SQL Server using Aspire]]></summary><media:thumbnail xmlns:media="http://search.yahoo.com/mrss/" url="https://www.davidguida.net/assets/uploads/2025/03/aspire-azure-sql-server-sku.jpg" /><media:content medium="image" url="https://www.davidguida.net/assets/uploads/2025/03/aspire-azure-sql-server-sku.jpg" xmlns:media="http://search.yahoo.com/mrss/" /></entry><entry><title type="html">Riverdam - Feature Gates Finally Made Easy</title><link href="https://www.davidguida.net/riverdam-feature-gates-finally-made-easy" rel="alternate" type="text/html" title="Riverdam - Feature Gates Finally Made Easy" /><published>2025-02-21T05:57:23+00:00</published><updated>2025-02-21T05:57:23+00:00</updated><id>https://www.davidguida.net/riverdam-feature-gates-finally-made-easy</id><content type="html" xml:base="https://www.davidguida.net/riverdam-feature-gates-finally-made-easy"><![CDATA[<p>First post of the year! This one will be brief. I’ve always liked the idea of Feature Gates. Not only because it reminds me of the <a href="https://en.wikipedia.org/wiki/Baldur%27s_Gate_II:_Shadows_of_Amn">best videogame ever made</a>, but also for the confidence they provide when rolling out new functionalities. I tend to <a href="https://en.wikipedia.org/wiki/Defensive_programming">code defensivelydefensively</a> most of the time, trying to use TDD as much as possible (when it makes sense, of course).</p>

<p><a href="/feature-gating-part-1-what-is-it/">A long time ago</a>, I wrote about the general idea behind Feature Gating and how it helps lessen the pain of releasing software.</p>

<p>This time, however, I want to make a small announcement: I have been working on another pet project for a while, and I have finally reached the first milestone.</p>

<h3 id="enter-riverdam-">Enter <strong><a href="https://www.riverdam.dev">Riverdam</a></strong> !</h3>

<p>I love simplicity and no-fuss applications. This is why I decided to create <em>my own</em>  feature gating API and release it online.</p>

<p><strong>Riverdam</strong> is essentially Feature Gating-As-A-Service (FGAAS? Maybe, who knows). It features a user-friendly dashboard that allows you to configure your projects and their flags for each environment, along with a super simple API to query the status.</p>

<p>I also added a system that lets you define custom rules for each feature and have them evaluated on the fly. For example, you can ask, “Is feature XXX enabled on DEV for the logged user?”</p>

<p>I am well aware that there are many commercial and non-commercial tools that offer similar functionality. However, I wanted to create something from scratch and release it publicly.</p>

<p>The best part? It’s totally free! Well, with some limitations for now, but it should be enough to give you a sense of what the platform does.</p>

<p>Give it a try and let me know what you think!</p>]]></content><author><name>David Guida</name></author><category term="Product" /><category term="Rambling" /><category term="Design Patterns" /><summary type="html"><![CDATA[Ever wished for a simpler way to manage feature gates? Your wish is now a reality with Riverdam!]]></summary><media:thumbnail xmlns:media="http://search.yahoo.com/mrss/" url="https://www.davidguida.net/assets/uploads/2025/02/riverdam-feature-gates-finally-made-easy.jpg" /><media:content medium="image" url="https://www.davidguida.net/assets/uploads/2025/02/riverdam-feature-gates-finally-made-easy.jpg" xmlns:media="http://search.yahoo.com/mrss/" /></entry><entry><title type="html">Are you using Dictionaries correctly?</title><link href="https://www.davidguida.net/dictionary-lookup-performance" rel="alternate" type="text/html" title="Are you using Dictionaries correctly?" /><published>2024-11-18T05:57:23+00:00</published><updated>2024-11-18T05:57:23+00:00</updated><id>https://www.davidguida.net/dictionary-lookup-performance</id><content type="html" xml:base="https://www.davidguida.net/dictionary-lookup-performance"><![CDATA[<p>A while ago I wrote a <a href="/lookup-performance" target="_blank">small comparison</a> between Dictionary, HashSet, SortedList and SortedDictionary when performing a lookup operation.</p>

<p>I have noticed however that many developers don’t use the most efficient method for checking if an item exists and retrieving it.</p>

<p>Most of the times, you’ll see something like this:</p>

<div class="language-csharp highlighter-rouge"><div class="highlight"><pre class="highlight"><code><span class="k">if</span> <span class="p">(</span><span class="n">myDictionary</span><span class="p">.</span><span class="nf">ContainsKey</span><span class="p">(</span><span class="n">key</span><span class="p">))</span>
<span class="p">{</span>
    <span class="kt">var</span> <span class="k">value</span> <span class="p">=</span> <span class="n">myDictionary</span><span class="p">[</span><span class="n">key</span><span class="p">];</span>
    <span class="c1">// do something with value</span>
<span class="p">}</span>
</code></pre></div></div>

<p>…which is fine and does its job. But if this code is in performance-sensitive paths, there’s a better and more concise way:</p>

<div class="language-csharp highlighter-rouge"><div class="highlight"><pre class="highlight"><code><span class="k">if</span> <span class="p">(</span><span class="n">myDictionary</span><span class="p">.</span><span class="nf">TryGetValue</span><span class="p">(</span><span class="n">key</span><span class="p">,</span> <span class="k">out</span> <span class="kt">var</span> <span class="k">value</span><span class="p">))</span> 
<span class="p">{</span>
  <span class="c1">// do something with value</span>
<span class="p">}</span>
</code></pre></div></div>

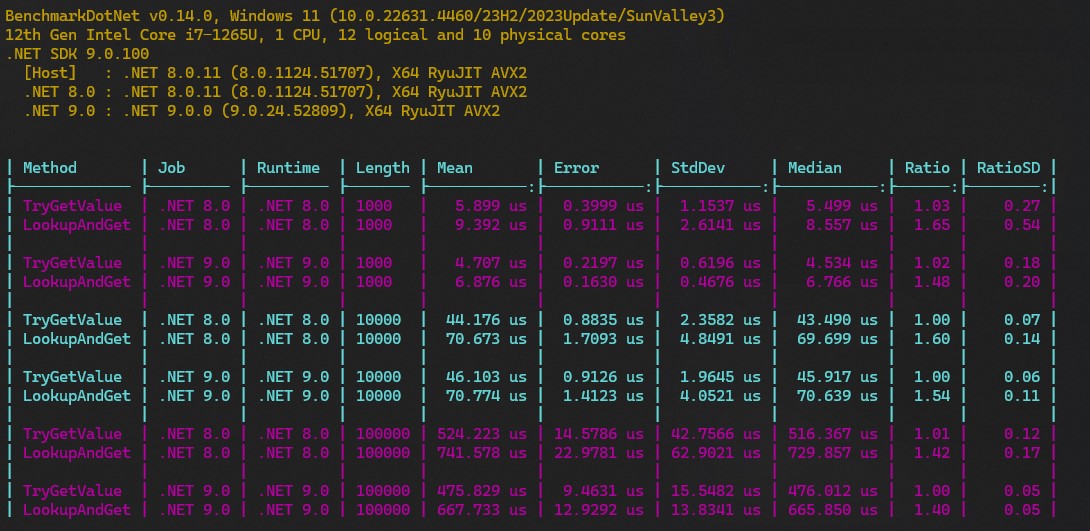
<p>“No big deal”, you might say. Well, this benchmark says otherwise:</p>

<p><img src="https://raw.githubusercontent.com/mizrael/DictionaryLookupBenchmark/36456254d1700c927fb85cb37356a7b4aae73ce1/dictionary.jpg" alt="" /></p>

<p>The calls to <code class="language-plaintext highlighter-rouge">TryGetValue</code> are almost 2x faster! <strong>But why is that?</strong></p>

<p>The reason is pretty simple actually: calling <code class="language-plaintext highlighter-rouge">ContainsKey</code> and then accessing the value by key is performing the lookup twice.</p>

<p>As you can see, I have also included a comparison between .NET 8 and 9. The difference is not abyssal, but we can still see an improvement.</p>

<p>As usual, the code for the benchmark is available on <a href="https://github.com/mizrael/DictionaryLookupBenchmark/blob/main/DictionaryLookupBenchmark/DictionaryLookupBenchmark.cs" target="_blank">GitHub</a>.</p>

<p>Enjoy!</p>]]></content><author><name>David Guida</name></author><category term=".NET" /><category term="Benchmark" /><category term="Data structures" /><summary type="html"><![CDATA[Are you sure you're using Dictionaries correctly? You might be surprised to know how much faster this other method can be!]]></summary><media:thumbnail xmlns:media="http://search.yahoo.com/mrss/" url="https://www.davidguida.net/assets/uploads/2024/11/dictionary-lookup-performance.jpg" /><media:content medium="image" url="https://www.davidguida.net/assets/uploads/2024/11/dictionary-lookup-performance.jpg" xmlns:media="http://search.yahoo.com/mrss/" /></entry><entry><title type="html">Building Resilient Systems Made Easy</title><link href="https://www.davidguida.net/building-resilient-systems-made-easy" rel="alternate" type="text/html" title="Building Resilient Systems Made Easy" /><published>2024-11-08T05:57:23+00:00</published><updated>2024-11-08T05:57:23+00:00</updated><id>https://www.davidguida.net/building-resilient-systems-made-easy</id><content type="html" xml:base="https://www.davidguida.net/building-resilient-systems-made-easy"><![CDATA[<h3 id="disclaimer">Disclaimer</h3>
<blockquote>
  <p>This article contains a snippet from my booklet: <a href="https://payhip.com/b/21Vo6" target="_blank">Building Resilient Systems Made Easy</a></p>
</blockquote>

<p>Let’s start by taking a look at the formal definition of the word “Resiliency”. The Merriam-Webster dictionary formalizes it like this:</p>

<p>1: the capability of a strained body to recover its size and shape after deformation caused especially by compressive stress</p>

<p>2: an ability to recover from or adjust easily to misfortune or change</p>

<p>“Resiliency” and “resilience” are synonyms and often used interchangeably, with the latter being more common and preferred in academic environments. Both describe the same concept: the capacity to recover quickly from difficulties or adapt to change.</p>

<p>When it comes to building software, resilience is the ability of a system to endure disruptions, recover from issues, and continuously evolve to maintain stability despite changes in its environment. A resilient system is dependable and predictable, capable of recovering effectively after setbacks.</p>

<p>Resilience is universally valued. Whether applied to individuals, machinery, or digital systems, the necessity for resilience is unquestionable.</p>

<p>From a technological standpoint, resilience involves ensuring our programs do not crash. Systems should handle errors gracefully, avoiding catastrophic failures that might bewilder users or, in severe cases, endanger them. Hardware resilience is equally crucial; consider whether a single machine outage is tolerable or if investment in redundant power supplies and networking is necessary to mitigate failure risks.</p>

<p>The advent of cloud computing has altered the landscape. Managing individual machines may no longer be under direct control. Instead, the focus shifts to selecting appropriate cloud services that fulfill specific requirements.</p>

<h3 id="why-does-it-matter">Why does it matter?</h3>

<p>In 2019, British Airways suffered a major failure of their IT systems due to a significant defect in one of their applications. The bug caused more than 100 flights to be dropped and caused a huge disruption of services in the Heathrow and Gatwick airports.</p>

<p>In 2023, a Google data center in Paris had an incident described as “a multi-cluster failure which led to an emergency shutdown of multiple zones.” Apparently the issue was caused by a water leakage in a cooling system that brought to a fire incident in one of the rooms.</p>

<p>Even big companies can and will have incidents like these. What matters though is their ability to quickly investigate and recover from them.</p>

<p>Bottom line? Don’t stress too much. Plan for resiliency, do your best, and be prepared for Murphy’s law.</p>

<blockquote>
  <p>Don’t miss the rest of the chapter! <a href="https://store.davidguida.net/b/21Vo6" target="_blank">Building Resilient Systems Made Easy</a> is available now!</p>
</blockquote>]]></content><author><name>David Guida</name></author><category term="Software Architecture" /><category term="Design Patterns" /><category term="Booklet" /><summary type="html"><![CDATA["Building Resilient Systems Made Easy" contains some useful patterns and gotchas that will help you write more robust applications. Check it out now!]]></summary><media:thumbnail xmlns:media="http://search.yahoo.com/mrss/" url="https://www.davidguida.net/assets/uploads/2024/11/building-resilient-systems-made-easy.jpg" /><media:content medium="image" url="https://www.davidguida.net/assets/uploads/2024/11/building-resilient-systems-made-easy.jpg" xmlns:media="http://search.yahoo.com/mrss/" /></entry><entry><title type="html">AI Home Automation with Semantic Kernel part 2: let’s see some code!</title><link href="https://www.davidguida.net/2024-09-10-ai-home-automation-with-semantic-kernel-part-2" rel="alternate" type="text/html" title="AI Home Automation with Semantic Kernel part 2: let’s see some code!" /><published>2024-09-10T05:57:23+00:00</published><updated>2024-09-10T05:57:23+00:00</updated><id>https://www.davidguida.net/ai-home-automation-with-semantic-kernel-part-2</id><content type="html" xml:base="https://www.davidguida.net/2024-09-10-ai-home-automation-with-semantic-kernel-part-2"><![CDATA[<p>Welcome back to the second part of the series on Semantic Kernel! <a href="/2024-08-21-ai-home-automation-with-semantic-kernel-part-1">Last time</a> we talked a bit about <a href="https://learn.microsoft.com/en-us/semantic-kernel/overview/">Semantic Kernel</a>, what <a href="https://learn.microsoft.com/en-us/dotnet/api/microsoft.semantickernel.plugins.core?view=semantic-kernel-dotnet">Plugins</a> are and how <a href="https://platform.openai.com/docs/guides/function-calling">Function Calling</a> can help enhancing the results from the LLM we’re using.</p>

<p>Today we’re continuing on that path and see how we can make use of these building blocks to create a simple Home Assistant.</p>

<p>The application flow is quite simple:</p>
<ul>
  <li>an Azure Function that exposes some operations on our “smart” devices, like list, get details by id and change status</li>
  <li>a console app with Semantic Kernel</li>
  <li>our LLM deployed on <a href="https://azure.microsoft.com/en-us/products/ai-services/openai-service?msockid=2d09750a8ceb665a3a6a615d8dd06754">Azure OpenAI</a></li>
</ul>

<p>Let’s take a look at the Azure Function first.</p>

<p>I tried to keep things as simple as possible, so for this sample I decided to model all the sensors starting from a common <code class="language-plaintext highlighter-rouge">Device</code> class that looks more or less like this:</p>

<div class="language-csharp highlighter-rouge"><div class="highlight"><pre class="highlight"><code><span class="k">public</span> <span class="k">abstract</span> <span class="k">record</span> <span class="nc">Device</span>
<span class="p">{</span>
    <span class="k">public</span> <span class="kt">int</span> <span class="n">Id</span> <span class="p">{</span> <span class="k">get</span><span class="p">;</span> <span class="k">init</span><span class="p">;</span> <span class="p">}</span>
    <span class="k">public</span> <span class="kt">string</span> <span class="n">Name</span> <span class="p">{</span> <span class="k">get</span><span class="p">;</span> <span class="k">init</span><span class="p">;</span> <span class="p">}</span>
<span class="p">}</span>
</code></pre></div></div>

<p>A light can be turned on and off, so it’s definition can be just:</p>
<div class="language-csharp highlighter-rouge"><div class="highlight"><pre class="highlight"><code><span class="k">public</span> <span class="k">record</span> <span class="nc">Light</span> <span class="p">:</span> <span class="n">Device</span>
<span class="p">{</span>
    <span class="k">public</span> <span class="kt">bool</span> <span class="n">IsOn</span> <span class="p">{</span> <span class="k">get</span><span class="p">;</span> <span class="k">set</span><span class="p">;</span> <span class="p">}</span>
<span class="p">}</span>
</code></pre></div></div>

<p>Similar thing for door sensors:</p>
<div class="language-csharp highlighter-rouge"><div class="highlight"><pre class="highlight"><code><span class="k">public</span> <span class="k">record</span> <span class="nc">DoorSensor</span> <span class="p">:</span> <span class="n">Device</span>
<span class="p">{</span>
    <span class="k">public</span> <span class="kt">bool</span> <span class="n">IsOpen</span> <span class="p">{</span> <span class="k">get</span><span class="p">;</span> <span class="k">set</span><span class="p">;</span> <span class="p">}</span>
<span class="p">}</span>
</code></pre></div></div>

<p>The Function App exposes a bunch of triggers to operate on these models. For example, to update the state of a door sensor, we have to do a POST call to <code class="language-plaintext highlighter-rouge">doorsensors/{sensorId:int}/state</code> and pass a boolean value defining the new state.</p>

<p>The trigger will execute this:</p>
<div class="language-csharp highlighter-rouge"><div class="highlight"><pre class="highlight"><code><span class="p">[</span><span class="nf">Function</span><span class="p">(</span><span class="k">nameof</span><span class="p">(</span><span class="n">ChangeDoorSensorState</span><span class="p">))]</span>
<span class="k">public</span> <span class="k">async</span> <span class="n">Task</span><span class="p">&lt;</span><span class="n">IActionResult</span><span class="p">&gt;</span> <span class="nf">ChangeDoorSensorState</span><span class="p">(</span>
    <span class="p">[</span><span class="nf">HttpTrigger</span><span class="p">(</span><span class="n">AuthorizationLevel</span><span class="p">.</span><span class="n">Function</span><span class="p">,</span> <span class="s">"post"</span><span class="p">,</span> <span class="n">Route</span> <span class="p">=</span> <span class="s">"doorsensors/{sensorId:int}/state"</span><span class="p">)]</span> <span class="n">HttpRequestData</span> <span class="n">req</span><span class="p">,</span> 
    <span class="kt">int</span> <span class="n">sensorId</span><span class="p">)</span>
<span class="p">{</span>
    <span class="kt">var</span> <span class="n">newState</span> <span class="p">=</span> <span class="k">await</span> <span class="n">req</span><span class="p">.</span><span class="n">ReadFromJsonAsync</span><span class="p">&lt;</span><span class="kt">bool</span><span class="p">&gt;().</span><span class="nf">ConfigureAwait</span><span class="p">(</span><span class="k">false</span><span class="p">);</span>

    <span class="kt">var</span> <span class="n">sensor</span> <span class="p">=</span> <span class="n">_doorSensorsRepository</span><span class="p">.</span><span class="nf">GetById</span><span class="p">(</span><span class="n">sensorId</span><span class="p">);</span>
    <span class="k">if</span> <span class="p">(</span><span class="n">sensor</span> <span class="k">is</span> <span class="k">null</span><span class="p">)</span>
        <span class="k">return</span> <span class="k">new</span> <span class="nf">NotFoundResult</span><span class="p">();</span>

    <span class="n">sensor</span><span class="p">.</span><span class="n">IsOpen</span> <span class="p">=</span> <span class="n">newState</span><span class="p">;</span>

    <span class="k">return</span> <span class="k">new</span> <span class="nf">OkObjectResult</span><span class="p">(</span><span class="n">sensor</span><span class="p">);</span>
<span class="p">}</span>
</code></pre></div></div>

<p>Let’s have a look at the Console App now. This will be our way to “talk” with the Smart Agent.</p>

<p>The first thing we have to do, after having parsed the appsettings, is to setup the Kernel. 
We start by configuring the OpenAI Chat Completion service:</p>

<div class="language-csharp highlighter-rouge"><div class="highlight"><pre class="highlight"><code><span class="kt">var</span> <span class="n">credentials</span> <span class="p">=</span> <span class="k">new</span> <span class="nf">DefaultAzureCredential</span><span class="p">();</span>
<span class="kt">var</span> <span class="n">kernelBuilder</span> <span class="p">=</span> <span class="n">Kernel</span><span class="p">.</span><span class="nf">CreateBuilder</span><span class="p">();</span>
<span class="kt">var</span> <span class="n">config</span> <span class="p">=</span> <span class="n">host</span><span class="p">.</span><span class="n">Services</span><span class="p">.</span><span class="n">GetRequiredService</span><span class="p">&lt;</span><span class="n">IConfiguration</span><span class="p">&gt;();</span>
<span class="n">kernelBuilder</span><span class="p">.</span><span class="nf">AddAzureOpenAIChatCompletion</span><span class="p">(</span>
    <span class="n">config</span><span class="p">[</span><span class="s">"OpenAiModelId"</span><span class="p">]!,</span>
    <span class="n">endpoint</span><span class="p">:</span> <span class="n">config</span><span class="p">[</span><span class="s">"OpenAiEndpoint"</span><span class="p">]!,</span>
    <span class="n">credentials</span><span class="p">);</span>
</code></pre></div></div>

<p>Now we have to configure the Plugins (more on these in a minute):</p>
<div class="language-csharp highlighter-rouge"><div class="highlight"><pre class="highlight"><code><span class="kt">var</span> <span class="n">lightsPlugin</span> <span class="p">=</span> <span class="n">host</span><span class="p">.</span><span class="n">Services</span><span class="p">.</span><span class="n">GetRequiredService</span><span class="p">&lt;</span><span class="n">LightsPlugin</span><span class="p">&gt;();</span>
<span class="n">kernelBuilder</span><span class="p">.</span><span class="n">Plugins</span><span class="p">.</span><span class="nf">AddFromObject</span><span class="p">(</span><span class="n">lightsPlugin</span><span class="p">);</span>
<span class="kt">var</span> <span class="n">doorSensorsPlugin</span> <span class="p">=</span> <span class="n">host</span><span class="p">.</span><span class="n">Services</span><span class="p">.</span><span class="n">GetRequiredService</span><span class="p">&lt;</span><span class="n">DoorSensorsPlugin</span><span class="p">&gt;();</span>
<span class="n">kernelBuilder</span><span class="p">.</span><span class="n">Plugins</span><span class="p">.</span><span class="nf">AddFromObject</span><span class="p">(</span><span class="n">doorSensorsPlugin</span><span class="p">);</span>
</code></pre></div></div>

<p>And finally we can build the Kernel object:</p>
<div class="language-csharp highlighter-rouge"><div class="highlight"><pre class="highlight"><code><span class="kt">var</span> <span class="n">kernel</span> <span class="p">=</span> <span class="n">kernelBuilder</span><span class="p">.</span><span class="nf">Build</span><span class="p">();</span>
</code></pre></div></div>

<p>As we saw in Part 1, Plugins are normal classes that expose the extra functionalities we want to add. Each method has to be decorated with some attributes that describe in plain english their purpose as clearly as possible. This is necessary to help the LLM understand what the functionality does and decide if call it or not.</p>

<p>Our <code class="language-plaintext highlighter-rouge">LightsPlugin</code> is nothing more than a wrapper over an <code class="language-plaintext highlighter-rouge">HttpClient</code> that would call the triggers exposed by our Function App.</p>

<p>For example, to retrieve the list of all the lights:</p>

<div class="language-csharp highlighter-rouge"><div class="highlight"><pre class="highlight"><code><span class="k">public</span> <span class="k">class</span> <span class="nc">LightsPlugin</span>
<span class="p">{</span>
  <span class="k">private</span> <span class="k">readonly</span> <span class="n">HttpClient</span> <span class="n">_httpClient</span><span class="p">;</span>
  <span class="k">private</span> <span class="k">readonly</span> <span class="n">ILogger</span><span class="p">&lt;</span><span class="n">LightsPlugin</span><span class="p">&gt;</span> <span class="n">_logger</span><span class="p">;</span>

  <span class="k">public</span> <span class="nf">LightsPlugin</span><span class="p">(</span><span class="n">HttpClient</span> <span class="n">httpClient</span><span class="p">,</span> <span class="n">ILogger</span><span class="p">&lt;</span><span class="n">LightsPlugin</span><span class="p">&gt;</span> <span class="n">logger</span><span class="p">)</span>
  <span class="p">{</span>
      <span class="n">_httpClient</span> <span class="p">=</span> <span class="n">httpClient</span><span class="p">;</span>
      <span class="n">_logger</span> <span class="p">=</span> <span class="n">logger</span><span class="p">;</span>
  <span class="p">}</span>

  <span class="p">[</span><span class="nf">KernelFunction</span><span class="p">(</span><span class="s">"get_lights"</span><span class="p">)]</span>
  <span class="p">[</span><span class="nf">Description</span><span class="p">(</span><span class="s">"Gets a list of lights and their current state"</span><span class="p">)]</span>
  <span class="p">[</span><span class="k">return</span><span class="p">:</span> <span class="nf">Description</span><span class="p">(</span><span class="s">"A collection of lights"</span><span class="p">)]</span>
  <span class="k">public</span> <span class="k">async</span> <span class="n">Task</span><span class="p">&lt;</span><span class="n">IEnumerable</span><span class="p">&lt;</span><span class="n">Light</span><span class="p">&gt;&gt;</span> <span class="nf">GetLightsAsync</span><span class="p">()</span>
  <span class="p">{</span>
      <span class="n">_logger</span><span class="p">.</span><span class="nf">LogInformation</span><span class="p">(</span><span class="s">"Getting all the lights..."</span><span class="p">);</span>

      <span class="kt">var</span> <span class="n">response</span> <span class="p">=</span> <span class="k">await</span> <span class="n">_httpClient</span><span class="p">.</span><span class="nf">GetAsync</span><span class="p">(</span><span class="s">"api/lights"</span><span class="p">);</span>
      <span class="n">response</span><span class="p">.</span><span class="nf">EnsureSuccessStatusCode</span><span class="p">();</span>
      <span class="kt">var</span> <span class="n">lights</span> <span class="p">=</span> <span class="k">await</span> <span class="n">response</span><span class="p">.</span><span class="n">Content</span><span class="p">.</span><span class="n">ReadFromJsonAsync</span><span class="p">&lt;</span><span class="n">IEnumerable</span><span class="p">&lt;</span><span class="n">Light</span><span class="p">&gt;&gt;()</span>
                                          <span class="p">.</span><span class="nf">ConfigureAwait</span><span class="p">(</span><span class="k">false</span><span class="p">);</span>
      <span class="k">return</span> <span class="n">lights</span> <span class="p">??</span> <span class="n">Array</span><span class="p">.</span><span class="n">Empty</span><span class="p">&lt;</span><span class="n">Light</span><span class="p">&gt;();</span>
  <span class="p">}</span>
<span class="p">}</span>
</code></pre></div></div>

<p>Now let’s see how we can combine everything and start using the Smart Assistant:</p>

<div class="language-csharp highlighter-rouge"><div class="highlight"><pre class="highlight"><code><span class="kt">var</span> <span class="n">chatCompletionService</span> <span class="p">=</span> <span class="n">kernel</span><span class="p">.</span><span class="n">GetRequiredService</span><span class="p">&lt;</span><span class="n">IChatCompletionService</span><span class="p">&gt;();</span>
<span class="n">OpenAIPromptExecutionSettings</span> <span class="n">openAIPromptExecutionSettings</span> <span class="p">=</span> <span class="k">new</span><span class="p">()</span>
<span class="p">{</span>
    <span class="n">ToolCallBehavior</span> <span class="p">=</span> <span class="n">ToolCallBehavior</span><span class="p">.</span><span class="n">AutoInvokeKernelFunctions</span>
<span class="p">};</span>

<span class="kt">var</span> <span class="n">history</span> <span class="p">=</span> <span class="k">new</span> <span class="nf">ChatHistory</span><span class="p">();</span>

<span class="k">while</span> <span class="p">(</span><span class="k">true</span><span class="p">)</span>
<span class="p">{</span>
    <span class="kt">var</span> <span class="n">question</span> <span class="p">=</span> <span class="n">Console</span><span class="p">.</span><span class="nf">ReadLine</span><span class="p">()!.</span><span class="nf">Trim</span><span class="p">();</span>
   
    <span class="n">history</span><span class="p">.</span><span class="nf">AddUserMessage</span><span class="p">(</span><span class="n">question</span><span class="p">);</span>

    <span class="kt">var</span> <span class="n">result</span> <span class="p">=</span> <span class="k">await</span> <span class="n">chatCompletionService</span><span class="p">.</span><span class="nf">GetChatMessageContentAsync</span><span class="p">(</span>
       <span class="n">history</span><span class="p">,</span>
       <span class="n">executionSettings</span><span class="p">:</span> <span class="n">openAIPromptExecutionSettings</span><span class="p">,</span>
       <span class="n">kernel</span><span class="p">:</span> <span class="n">kernel</span><span class="p">);</span>

    <span class="n">history</span><span class="p">.</span><span class="nf">Add</span><span class="p">(</span><span class="n">result</span><span class="p">);</span>
    <span class="n">Console</span><span class="p">.</span><span class="nf">WriteLine</span><span class="p">(</span><span class="n">result</span><span class="p">);</span>
<span class="p">}</span>
</code></pre></div></div>

<p>I’ve stripped out a lot of code just to focus on the core. We start by retrieving the Chat Completion service from the kernel and then we initialize a chat history, which will be used to keep track of the requests we make to the Agent.</p>

<p>At this point we can start reading our input from the terminal (voice control TBD! :D ), appending it to the <code class="language-plaintext highlighter-rouge">history</code> and calling the chat service.</p>

<h3 id="the-magic-trick-lies-in-the-openaipromptexecutionsettings-object-it-tells-the-llm-to-automatically-invoke-functions-from-plugins-in-case-they-match-our-query">The magic trick lies in the <code class="language-plaintext highlighter-rouge">openAIPromptExecutionSettings</code> object: it tells the LLM to automatically invoke functions from Plugins in case they match our query.</h3>

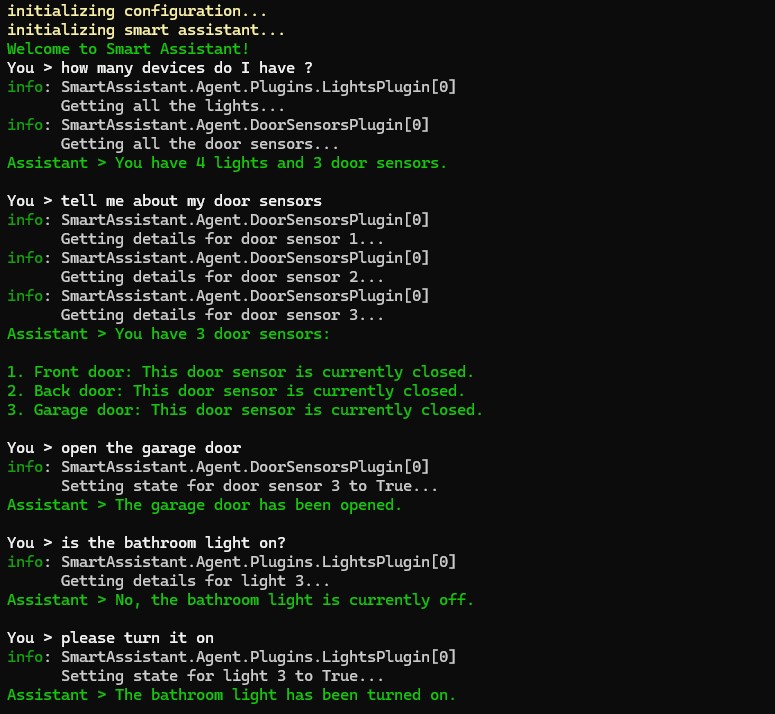
<p>If we now run our app, we should be able to ask our Smart Assistant to interact with the devices we have available:</p>

<p><img src="/assets/uploads/2024/09/semantic-kernel-plugins.jpg" alt="Semantic Kernel Smart Assistant" /></p>

<p>All the code is available on <a href="https://github.com/mizrael/SmartAssistant">GitHub</a>, have fun!</p>]]></content><author><name>David Guida</name></author><category term=".NET" /><category term="Azure" /><category term="OpenAI" /><category term="Semantic Kernel" /><summary type="html"><![CDATA[Let's see how we can configure Semantic Kernel Plugins to call an Azure Function and build our AI-powered Home Automation Assistant!]]></summary><media:thumbnail xmlns:media="http://search.yahoo.com/mrss/" url="https://www.davidguida.net/assets/uploads/2024/09/ai-home-automation-with-semantic-kernel-part-2.jpg" /><media:content medium="image" url="https://www.davidguida.net/assets/uploads/2024/09/ai-home-automation-with-semantic-kernel-part-2.jpg" xmlns:media="http://search.yahoo.com/mrss/" /></entry><entry><title type="html">AI Home Automation with Semantic Kernel part 1: introduction</title><link href="https://www.davidguida.net/2024-08-21-ai-home-automation-with-semantic-kernel-part-1" rel="alternate" type="text/html" title="AI Home Automation with Semantic Kernel part 1: introduction" /><published>2024-08-21T05:57:23+00:00</published><updated>2024-08-21T05:57:23+00:00</updated><id>https://www.davidguida.net/ai-home-automation-with-semantic-kernel-part-1</id><content type="html" xml:base="https://www.davidguida.net/2024-08-21-ai-home-automation-with-semantic-kernel-part-1"><![CDATA[<p>When I approach something new though, I always have to have a practical application or a simple project to build with it, otherwise I will soon lose interest.</p>

<p>Luckily, I recently moved to a new house and started messing with home automation. I am probably never going to build everything on my own, but in any case, this triggered me to start playing with AI.</p>

<p>I have been playing a bit with <a href="https://learn.microsoft.com/en-us/semantic-kernel/overview/">Semantic Kernel</a> lately and it’s increbile how easy it is to integrate it with an AI model and create something from scratch.</p>

<p>So, for my project I wanted to have some kind of chat application where I can ask the status of my home devices and possibly interact with them.</p>

<p>To keep things simple, I started with just lights and door sensors. The operations would basically be:</p>
<ul>
  <li>listing all devices (perhaps specifying the type)</li>
  <li>get details about a specific device</li>
  <li>turn on/off a light</li>
  <li>open/close a door</li>
</ul>

<h3 id="the-point-now-is-how-can-i-have-the-llm-interact-with-those-devices-the-answer-is-semantic-kernel">The point now is: how can I have the LLM interact with those devices? The answer is: Semantic Kernel!</h3>

<p>The first step is to setup a Chat Completion service with a model hosted on Azure. This way I can have simple conversations in plain english, but there’s no actual <em>interaction</em>. Now I need to make the agent understand prompts like <em>“how many lights do I have?”</em> or <em>“turn the bathroom light off”</em>.</p>

<p>For this, I can leverage the concept of <a href="https://platform.openai.com/docs/guides/function-calling">Function Calling</a> that some models expose.</p>

<p>Functions are basically custom code we can write and expose to the model so that it can execute more advanced functionalities.</p>

<p>In simple terms:</p>
<ul>
  <li>the user asks something</li>
  <li>the model parses the prompt and decides whether to use one or more of the registered functions</li>
  <li>the model tells the client application to run the functions (and can even pass parameters!)</li>
  <li>the model grabs the results and aggregates it with the LLM results to build the message that will be presented to the user</li>
</ul>

<p>Semantic Kernel makes everything easy by allowing us to create Plugins, which encapsulate the Functions:</p>

<div class="language-csharp highlighter-rouge"><div class="highlight"><pre class="highlight"><code><span class="k">public</span> <span class="k">class</span> <span class="nc">MyFancyPlugin</span>
<span class="p">{</span>
  <span class="p">[</span><span class="nf">KernelFunction</span><span class="p">(</span><span class="s">"get_current_time"</span><span class="p">)]</span>
  <span class="p">[</span><span class="nf">Description</span><span class="p">(</span><span class="s">"Gets the current time"</span><span class="p">)]</span>
  <span class="p">[</span><span class="k">return</span><span class="p">:</span> <span class="nf">Description</span><span class="p">(</span><span class="s">"the current time in UTC"</span><span class="p">)]</span>
  <span class="k">public</span> <span class="n">DateTimeOffset</span> <span class="nf">GetCurrentTime</span><span class="p">()</span>
  <span class="p">{</span>
    <span class="k">return</span> <span class="n">DateTimeOffset</span><span class="p">.</span><span class="n">UtcNow</span><span class="p">;</span>
  <span class="p">}</span>
<span class="p">}</span>
</code></pre></div></div>

<p>As you can see, a Plugin is a simple class that exposes our custom methods. Each method has to be decorated with the <code class="language-plaintext highlighter-rouge">KernelFunction</code> attribute and at least one <code class="language-plaintext highlighter-rouge">Description</code>, which provides some context to the model.</p>

<p>Now all we have to do is to register it during startup:</p>
<div class="language-csharp highlighter-rouge"><div class="highlight"><pre class="highlight"><code><span class="kt">var</span> <span class="n">kernelBuilder</span> <span class="p">=</span> <span class="n">Kernel</span><span class="p">.</span><span class="nf">CreateBuilder</span><span class="p">();</span>
<span class="n">kernelBuilder</span><span class="p">.</span><span class="n">Plugins</span><span class="p">.</span><span class="n">AddFromType</span><span class="p">&lt;</span><span class="n">MyFancyPlugin</span><span class="p">&gt;();</span>
<span class="kt">var</span> <span class="n">kernel</span> <span class="p">=</span> <span class="n">kernelBuilder</span><span class="p">.</span><span class="nf">Build</span><span class="p">();</span>
</code></pre></div></div>

<p>This way we can ask the model something like <em>“can you tell me what time it is?”</em>.</p>

<p>There is already a <a href="https://learn.microsoft.com/en-us/dotnet/api/microsoft.semantickernel.plugins.core?view=semantic-kernel-dotnet">nice list</a> of Plugins available and the team is actively adding more and more.</p>

<p>That’s all for today! The next time we’ll jump into the code and see how to plug all the pieces together and build our smart assistant.</p>

<p>But in case you’re too curious, all the sources are already available on <a href="https://github.com/mizrael/SmartAssistant">GitHub</a>. Ciao!</p>]]></content><author><name>David Guida</name></author><category term=".NET" /><category term="Azure" /><category term="OpenAI" /><category term="Semantic Kernel" /><summary type="html"><![CDATA[Learn how to build an AI-powered Home Automation assistant using Semantic Kernel and Azure OpenAI]]></summary><media:thumbnail xmlns:media="http://search.yahoo.com/mrss/" url="https://www.davidguida.net/assets/uploads/2024/08/ai-home-automation-with-semantic-kernel-part-1.jpg" /><media:content medium="image" url="https://www.davidguida.net/assets/uploads/2024/08/ai-home-automation-with-semantic-kernel-part-1.jpg" xmlns:media="http://search.yahoo.com/mrss/" /></entry><entry><title type="html">What’s a Topic and how can we implement it using Azure Storage Queues?</title><link href="https://www.davidguida.net/azure-storage-topics" rel="alternate" type="text/html" title="What’s a Topic and how can we implement it using Azure Storage Queues?" /><published>2024-07-19T05:57:23+00:00</published><updated>2024-07-19T05:57:23+00:00</updated><id>https://www.davidguida.net/azure-storage-topics</id><content type="html" xml:base="https://www.davidguida.net/azure-storage-topics"><![CDATA[<p>I really like Azure ServiceBus, it’s fast, reliable and really easy to integrate into a code base. But when I’m testing something out, or when I really don’t want to worry too much about infrastructure, I’d rather use something simpler, like Azure Storage Queues. They’re quite good for simple use cases and/or prototypes.</p>

<h3 id="however-they-lack-one-critical-thing-topics">However, they lack one critical thing: Topics.</h3>

<p>What’s a <em>Topic</em>, you’d ask. Well, let me take a step back then.</p>

<p>Without going too much into the rabbit hole, when it comes to messages on a queue, we have two major categories: <strong>commands</strong> and <strong>events</strong>.</p>

<p>A <em>command</em> is a fire-and-forget operation, meant to be handled by <strong>a single</strong> consumer. Of course you can have multiple instances of this consumer application, all listening on the same queue. But they would all be <strong>competing</strong> for a message. In this case, first come, first served.</p>
<h4 id="a-command-its-basically-a-request-to-get-something-done">A Command it’s basically a request to get something done.</h4>

<p>Another important property is that a Command should contain all the information necessary to the consumer for handling it.</p>

<p>On the other end, an <em>event</em> represents the encoded information about something that has happened on our system. We’re basically broadcasting the fact that (for example) a new user account has been created and we want the rest of the world to know about it.</p>

<p>The usual naming convention is with the past tense: <code class="language-plaintext highlighter-rouge">UserCreated</code>, <code class="language-plaintext highlighter-rouge">OrderPlaced</code> and so on.
Events are meant to be picked up by multiple consumers, each one possibly belonging to a different <em>group</em>.</p>

<p>Groups represent the logical context that would handle that specific event. For example, suppose we’ve published an <code class="language-plaintext highlighter-rouge">OrderPlaced</code> event. We can have a User Notification service picking it up, that would send an email to the customer. A Warehouse Notification service that would instead send an email to the warehouse manager. A Reporting service would record the information and use it to update the reports.</p>

<p>Each service might have multiple instances to improve resiliency, and each instance would belong to the same consumer group.</p>

<p>Unlike Commands, Events instead carry only the bare minimum information necessary. For example, in an <code class="language-plaintext highlighter-rouge">OrderPlaced</code>, we would probably find only the <code class="language-plaintext highlighter-rouge">OrderId</code>, and perhaps the <code class="language-plaintext highlighter-rouge">CustomerId</code>. Each interested service would then pull the data they need, based on <em>their</em> requirements.</p>

<p>Now, why the long introduction? In Azure ServiceBus, we can create a Topic and link it to multiple <em>Subscriptions</em>, each one representing a consumer group.</p>

<h3 id="subscriptions-are-basically-queues-all-receiving-the-same-message">Subscriptions are basically queues, all receiving the same message.</h3>

<p>As I mentioned before, Azure Storage Queue don’t support Topics, which are the way we can easily broadcast an event to multiple subscriptions. I had some time on my hands during my summer break and I decided to fill the gap.
I spent some time researching and wrote a veeeery simple Custom Binding for Azure Functions, that I called <a href="https://github.com/mizrael/AzureStorageTopics" target="_blank">Azure Storage Topics</a>.</p>

<p>Usage is pretty straightforward: just add the <a href="https://www.nuget.org/packages/AzureStorageTopics/" target="_blank">Nuget package</a> to your Azure Functions project, then add the Output binding:</p>

<div class="language-csharp highlighter-rouge"><div class="highlight"><pre class="highlight"><code><span class="p">[</span><span class="nf">FunctionName</span><span class="p">(</span><span class="k">nameof</span><span class="p">(</span><span class="n">SendToTopic</span><span class="p">))]</span>
<span class="k">public</span> <span class="k">static</span> <span class="k">async</span> <span class="n">Task</span><span class="p">&lt;</span><span class="n">IActionResult</span><span class="p">&gt;</span> <span class="nf">SendToTopic</span><span class="p">(</span>
    <span class="p">[</span><span class="nf">HttpTrigger</span><span class="p">(</span><span class="n">AuthorizationLevel</span><span class="p">.</span><span class="n">Function</span><span class="p">,</span> <span class="s">"get"</span><span class="p">,</span> <span class="s">"post"</span><span class="p">,</span> <span class="n">Route</span> <span class="p">=</span> <span class="k">null</span><span class="p">)]</span> <span class="n">HttpRequest</span> <span class="n">req</span><span class="p">,</span>
    <span class="p">[</span><span class="nf">StorageTopic</span><span class="p">(</span><span class="s">"MyTopic"</span><span class="p">)]</span> <span class="n">IAsyncCollector</span><span class="p">&lt;</span><span class="kt">string</span><span class="p">&gt;</span> <span class="n">outputTopic</span><span class="p">)</span>
<span class="p">{</span>
    <span class="k">await</span> <span class="n">outputTopic</span><span class="p">.</span><span class="nf">AddAsync</span><span class="p">(</span><span class="s">"hello world"</span><span class="p">);</span>

    <span class="k">return</span> <span class="k">new</span> <span class="nf">OkObjectResult</span><span class="p">(</span><span class="s">"wow"</span><span class="p">);</span>
<span class="p">}</span>
</code></pre></div></div>

<p>Subscriptions can be configured directly in the <code class="language-plaintext highlighter-rouge">host.json</code> file:</p>
<div class="language-json highlighter-rouge"><div class="highlight"><pre class="highlight"><code><span class="p">{</span><span class="w">
  </span><span class="nl">"extensions"</span><span class="p">:</span><span class="w"> </span><span class="p">{</span><span class="w">
    </span><span class="nl">"storageTopics"</span><span class="p">:</span><span class="w"> </span><span class="p">{</span><span class="w">
      </span><span class="nl">"topics"</span><span class="p">:</span><span class="w"> </span><span class="p">{</span><span class="w">
        </span><span class="nl">"MyTopic"</span><span class="p">:</span><span class="w"> </span><span class="p">{</span><span class="w">
          </span><span class="nl">"subscriptions"</span><span class="p">:</span><span class="w"> </span><span class="p">[</span><span class="w">
            </span><span class="p">{</span><span class="w">
              </span><span class="nl">"name"</span><span class="p">:</span><span class="w"> </span><span class="s2">"Subscription1"</span><span class="w">
            </span><span class="p">},</span><span class="w">
            </span><span class="p">{</span><span class="w">
              </span><span class="nl">"name"</span><span class="p">:</span><span class="w"> </span><span class="s2">"Subscription2"</span><span class="w">
            </span><span class="p">}</span><span class="w">
          </span><span class="p">]</span><span class="w">
        </span><span class="p">}</span><span class="w">
      </span><span class="p">}</span><span class="w">
    </span><span class="p">}</span><span class="w">
  </span><span class="p">}</span><span class="w">
</span><span class="p">}</span><span class="w">
</span></code></pre></div></div>

<p>Under the hood, the library is using the configuration from the <code class="language-plaintext highlighter-rouge">host.json</code> file to create one queue per subscription, using this naming convention: <code class="language-plaintext highlighter-rouge">topic-subscription</code>, lowercase.</p>

<p>When we’re calling the <code class="language-plaintext highlighter-rouge">.AddAsync()</code> method to publish a message, the system would retrieve the topic’s configuration, loop over the relative queues and send the message.</p>

<p>Easy peasy :)</p>]]></content><author><name>David Guida</name></author><category term=".NET" /><category term="Azure" /><category term="Messaging" /><category term="Events" /><summary type="html"><![CDATA[In this article we'll talk about basic messaging concepts and discuss what Topics are and how they can be implemented using Azure Storage Queues.]]></summary><media:thumbnail xmlns:media="http://search.yahoo.com/mrss/" url="https://www.davidguida.net/assets/uploads/2024/07/azure-storage-topics.jpg" /><media:content medium="image" url="https://www.davidguida.net/assets/uploads/2024/07/azure-storage-topics.jpg" xmlns:media="http://search.yahoo.com/mrss/" /></entry><entry><title type="html">How to generate Code Coverage for a .NET Solution</title><link href="https://www.davidguida.net/dotnet-code-coverage-github-action" rel="alternate" type="text/html" title="How to generate Code Coverage for a .NET Solution" /><published>2024-06-25T05:57:23+00:00</published><updated>2024-06-25T05:57:23+00:00</updated><id>https://www.davidguida.net/dotnet-code-coverage-github-action</id><content type="html" xml:base="https://www.davidguida.net/dotnet-code-coverage-github-action"><![CDATA[<p>I am a strenuous believer that a good code coverage is crucial for a project’s success. That of course doesn’t really apply to short lived applications, like prototypes or small apps that would be thrown away after a few days/weeks. But if you plan on keeping your creation alive for some time, and potentially doing maintenance and/or adding new features, having automated tests is definitely necessary.</p>

<p>Testing 100% of the codebase is in most cases impossible, and, to be honest, probably not that useful that much. I mean, testing values of properties on DTOs after setting tham doesn’t provide much value.
Things are different when those properties are calculated based on a formula. When there’s some logic behind, then it’s a good time to write a test.</p>

<p>But how do we keep track of how good our coverage is? Lukily for us, in .NET we have a quite nifty tool called <a href="https://github.com/coverlet-coverage/coverlet">Coverlet</a>. Basic usage is pretty straightforward: the first thing to do is to add the necessary references to your test projects:</p>

<div class="language-xml highlighter-rouge"><div class="highlight"><pre class="highlight"><code><span class="nt">&lt;ItemGroup&gt;</span>

    <span class="nt">&lt;PackageReference</span> <span class="na">Include=</span><span class="s">"coverlet.msbuild"</span> <span class="na">Version=</span><span class="s">"6.0.2"</span><span class="nt">&gt;</span>
      <span class="nt">&lt;IncludeAssets&gt;</span>runtime; build; native; contentfiles; analyzers; buildtransitive<span class="nt">&lt;/IncludeAssets&gt;</span>
      <span class="nt">&lt;PrivateAssets&gt;</span>all<span class="nt">&lt;/PrivateAssets&gt;</span>
    <span class="nt">&lt;/PackageReference&gt;</span>   

    <span class="nt">&lt;PackageReference</span> <span class="na">Include=</span><span class="s">"coverlet.collector"</span> <span class="na">Version=</span><span class="s">"6.0.0"</span><span class="nt">&gt;</span>
      <span class="nt">&lt;IncludeAssets&gt;</span>runtime; build; native; contentfiles; analyzers; buildtransitive<span class="nt">&lt;/IncludeAssets&gt;</span>
      <span class="nt">&lt;PrivateAssets&gt;</span>all<span class="nt">&lt;/PrivateAssets&gt;</span>
    <span class="nt">&lt;/PackageReference&gt;</span>
  <span class="nt">&lt;/ItemGroup&gt;</span>
</code></pre></div></div>

<p>Once you have that in place, all you need to do is to run the tests and ask for coverage generation:</p>
<div class="language-plaintext highlighter-rouge"><div class="highlight"><pre class="highlight"><code>dotnet test /p:CollectCoverage=true
</code></pre></div></div>

<p>The list of possible parameters is pretty long, and it’s possible to configure literally any aspect of it.</p>

<h3 id="one-nice-thing-though-is-that-you-can-generate-the-coverage-during-your-build-pipeline-and-then-run-any-type-of-analysis-you-want-on-that">One nice thing though, is that you can generate the coverage during your build pipeline and then run any type of analysis you want on that.</h3>

<p>For example, if you’re using GitHub Actions, you can do something like this:</p>

<div class="language-yaml highlighter-rouge"><div class="highlight"><pre class="highlight"><code><span class="na">name</span><span class="pi">:</span> <span class="s">.NET</span>

<span class="na">on</span><span class="pi">:</span>
  <span class="na">push</span><span class="pi">:</span>
  
<span class="na">jobs</span><span class="pi">:</span>
  <span class="na">build</span><span class="pi">:</span>

    <span class="na">runs-on</span><span class="pi">:</span> <span class="s">ubuntu-latest</span>

    <span class="na">steps</span><span class="pi">:</span>
    <span class="pi">-</span> <span class="na">uses</span><span class="pi">:</span> <span class="s">actions/checkout@v4</span>
    <span class="pi">-</span> <span class="na">name</span><span class="pi">:</span> <span class="s">Setup .NET</span>
      <span class="na">uses</span><span class="pi">:</span> <span class="s">actions/setup-dotnet@v4</span>
      <span class="na">with</span><span class="pi">:</span>
        <span class="na">dotnet-version</span><span class="pi">:</span> <span class="s">8.0.x</span>
    <span class="pi">-</span> <span class="na">name</span><span class="pi">:</span> <span class="s">Restore dependencies</span>
      <span class="na">run</span><span class="pi">:</span> <span class="pi">|</span>
        <span class="s">dotnet restore</span>
    <span class="pi">-</span> <span class="na">name</span><span class="pi">:</span> <span class="s">Build</span>
      <span class="na">run</span><span class="pi">:</span> <span class="pi">|</span>
        <span class="s">dotnet build --no-restore</span>
    <span class="pi">-</span> <span class="na">name</span><span class="pi">:</span> <span class="s">Test</span>
      <span class="na">run</span><span class="pi">:</span> <span class="pi">|</span>
        <span class="s">dotnet test --no-build -m:1 \</span>
          <span class="s">/p:CollectCoverage=true \</span>
          <span class="s">/p:CoverletOutput=../TestResults/ \</span>
          <span class="s">/p:MergeWith="../TestResults/coverage.json" </span>
</code></pre></div></div>

<p>We start with the usual process: we checkout the repo, setup .NET on the agent, restore the dependencies and build the solution.</p>

<p>At this point we can run <code class="language-plaintext highlighter-rouge">dotnet test</code> and skip the build, but we also instruct it to generate the coverage.</p>

<h3 id="the-interesting-point-here-is-that-if-youre-doing-this-on-an-entire-solution-by-specifying-the-mergewith-argument-all-the-results-from-each-individual-project-are-merged-into-one-file-and-then-saved-into-the-testresults-folder">The interesting point here is that if you’re doing this on <em>an entire Solution</em>, by specifying the <code class="language-plaintext highlighter-rouge">MergeWith</code> argument, all the results from each individual project are merged into one file and then saved into the <code class="language-plaintext highlighter-rouge">TestResults</code> folder.</h3>

<p>We also pass <code class="language-plaintext highlighter-rouge">-m:1</code>, which will ensure that the tests projects are processed sequentially. This would avoid any type of <em>contamination</em> that might occurr with parallel executions.</p>

<p>Now, let’s say that you want to add a nice badge on your readme file, showing the coverage results. We have to update a bit the <code class="language-plaintext highlighter-rouge">Test</code> step and add an additional one:</p>

<div class="language-yaml highlighter-rouge"><div class="highlight"><pre class="highlight"><code><span class="pi">-</span> <span class="na">name</span><span class="pi">:</span> <span class="s">Test</span>
  <span class="na">run</span><span class="pi">:</span> <span class="pi">|</span>
    <span class="s">dotnet test --no-build -m:1 \</span>
      <span class="s">/p:CollectCoverage=true \</span>
      <span class="s">/p:CoverletOutput=../TestResults/ \</span>
      <span class="s">/p:MergeWith="../TestResults/coverage.json" \</span>
      <span class="s">/p:CoverletOutputFormat=\"opencover,json\"</span>

<span class="pi">-</span> <span class="na">name</span><span class="pi">:</span> <span class="s">Create Test Coverage Badge</span>
  <span class="na">uses</span><span class="pi">:</span> <span class="s">simon-k/dotnet-code-coverage-badge@v1.0.0</span>
  <span class="na">id</span><span class="pi">:</span> <span class="s">create_coverage_badge</span>
  <span class="na">with</span><span class="pi">:</span>
    <span class="na">label</span><span class="pi">:</span> <span class="s">Unit Test Coverage</span>
    <span class="na">color</span><span class="pi">:</span> <span class="s">brightgreen</span>
    <span class="na">path</span><span class="pi">:</span> <span class="s">./tests/TestResults/coverage.opencover.xml</span>
    <span class="na">gist-filename</span><span class="pi">:</span> <span class="pi">[</span><span class="nv">the file name from the gist</span><span class="pi">]</span>
    <span class="na">gist-id</span><span class="pi">:</span> <span class="pi">[</span><span class="nv">the gist id</span><span class="pi">]</span>
    <span class="na">gist-auth-token</span><span class="pi">:</span> <span class="s">$</span>
</code></pre></div></div>

<p>We’re specifying the output format and instructing the CLI to generate both <code class="language-plaintext highlighter-rouge">json</code> and <code class="language-plaintext highlighter-rouge">opencover</code>. We need <code class="language-plaintext highlighter-rouge">json</code> for the intermediate results, so that <code class="language-plaintext highlighter-rouge">MergeWith</code> would keep working. <code class="language-plaintext highlighter-rouge">opencover</code> instead will be used by <code class="language-plaintext highlighter-rouge">dotnet-code-coverage-badge</code>.</p>

<p>Now, there’s a couple of things to do:</p>
<ol>
  <li>we need to create a new gist, with just one empty .json file in it, and copy the id</li>
  <li>we need to create a new <em>Fine-Grained token</em> with read and write access to gists. You can do it from <a href="https://github.com/settings/tokens">https://github.com/settings/tokens</a>.</li>
  <li>register the token as secret in your repository and update the workflow code.</li>
</ol>

<h4 id="bonus-point">Bonus point</h4>
<p>Some of you might have noticed that the coverage has been generated also for the <em>actual test projects</em>. But that’s not exactly what we want. So how do we exclude them?</p>

<p>The solution is pretty simple: add a <code class="language-plaintext highlighter-rouge">.runsettings</code> file and pass it to <code class="language-plaintext highlighter-rouge">dotnet test</code>:</p>

<div class="language-xml highlighter-rouge"><div class="highlight"><pre class="highlight"><code><span class="cp">&lt;?xml version="1.0" encoding="utf-8"?&gt;</span>
<span class="nt">&lt;RunSettings&gt;</span>
  <span class="c">&lt;!-- Configurations that affect the Test Framework --&gt;</span>
  <span class="nt">&lt;RunConfiguration&gt;</span>
    <span class="nt">&lt;MaxCpuCount&gt;</span>1<span class="nt">&lt;/MaxCpuCount&gt;</span>
    <span class="c">&lt;!-- Path relative to directory that contains .runsettings file--&gt;</span>
    <span class="nt">&lt;ResultsDirectory&gt;</span>.\TestResults<span class="nt">&lt;/ResultsDirectory&gt;</span>
    
    <span class="c">&lt;!-- true or false --&gt;</span>
    <span class="c">&lt;!-- Value that specifies the exit code when no tests are discovered --&gt;</span>
    <span class="nt">&lt;TreatNoTestsAsError&gt;</span>true<span class="nt">&lt;/TreatNoTestsAsError&gt;</span>
  <span class="nt">&lt;/RunConfiguration&gt;</span>
  <span class="nt">&lt;DataCollectionRunSettings&gt;</span>
    <span class="nt">&lt;DataCollectors&gt;</span>
      <span class="nt">&lt;DataCollector</span> <span class="na">friendlyName=</span><span class="s">"Code Coverage"</span> <span class="na">uri=</span><span class="s">"datacollector://Microsoft/CodeCoverage/2.0"</span> <span class="na">assemblyQualifiedName=</span><span class="s">"Microsoft.VisualStudio.Coverage.DynamicCoverageDataCollector, Microsoft.VisualStudio.TraceCollector, Version=11.0.0.0, Culture=neutral, PublicKeyToken=b03f5f7f11d50a3a"</span><span class="nt">&gt;</span>
        <span class="nt">&lt;Configuration&gt;</span>
          <span class="nt">&lt;CodeCoverage&gt;</span>
            <span class="nt">&lt;ModulePaths&gt;</span>
                <span class="nt">&lt;Include&gt;</span>
                    <span class="nt">&lt;ModulePath&gt;</span>[your assembly name].*.dll<span class="nt">&lt;/ModulePath&gt;</span>
                <span class="nt">&lt;/Include&gt;</span>
                <span class="nt">&lt;Exclude&gt;</span>
                    <span class="nt">&lt;ModulePath&gt;</span>.*Tests.dll<span class="nt">&lt;/ModulePath&gt;</span>
                <span class="nt">&lt;/Exclude&gt;</span>
            <span class="nt">&lt;/ModulePaths&gt;</span>
          <span class="nt">&lt;/CodeCoverage&gt;</span>
        <span class="nt">&lt;/Configuration&gt;</span>
      <span class="nt">&lt;/DataCollector&gt;</span>
    <span class="nt">&lt;/DataCollectors&gt;</span>
  <span class="nt">&lt;/DataCollectionRunSettings&gt;</span>
<span class="nt">&lt;/RunSettings&gt;</span>
</code></pre></div></div>

<p>The core lies in that <code class="language-plaintext highlighter-rouge">ModulePaths</code> node: we can specify which projects we want to <em>include</em> in the coverage generation, and which ones we really don’t want. Now all we have to do is update our workflow and pass this settings file using <code class="language-plaintext highlighter-rouge">-s</code>:</p>

<div class="language-yaml highlighter-rouge"><div class="highlight"><pre class="highlight"><code><span class="pi">-</span> <span class="na">name</span><span class="pi">:</span> <span class="s">Test</span>
      <span class="s">run</span><span class="err">:</span> <span class="pi">|</span>
        <span class="s">cd ./src</span>
        <span class="s">dotnet test --no-build -m:1 -s ../tests/tests.runsettings \</span>
          <span class="s">/p:CollectCoverage=true \</span>
          <span class="s">/p:CoverletOutput=../TestResults/ \</span>
          <span class="s">/p:MergeWith="../TestResults/coverage.json" \</span>
          <span class="s">/p:CoverletOutputFormat=\"opencover,json\"</span>
</code></pre></div></div>

<h3 id="if-you-want-to-see-all-of-this-in-action-im-using-this-method-on-my-small-db-engine-evenire">If you want to see all of this in action, I’m using this method on my small DB engine, <a href="https://github.com/mizrael/EvenireDB">Evenire</a>.</h3>

<p>Enjoy!</p>]]></content><author><name>David Guida</name></author><category term=".NET" /><category term="GitHub" /><category term="Code Coverage" /><category term="Testing" /><summary type="html"><![CDATA[How can we generate Code Coverage for an entire .NET Solution? This article walks you through the steps and shows how to integrate them in a GitHub Actions workflow.]]></summary><media:thumbnail xmlns:media="http://search.yahoo.com/mrss/" url="https://www.davidguida.net/assets/uploads/2024/06/dotnet-code-coverage-github-action.jpg" /><media:content medium="image" url="https://www.davidguida.net/assets/uploads/2024/06/dotnet-code-coverage-github-action.jpg" xmlns:media="http://search.yahoo.com/mrss/" /></entry></feed>