AI Home Automation with Semantic Kernel part 2: let's see some code!
Welcome back to the second part of the series on Semantic Kernel! Last time we talked a bit about Semantic Kernel, what Plugins are and how Function Calling can help enhancing the results from the LLM we’re using.
Today we’re continuing on that path and see how we can make use of these building blocks to create a simple Home Assistant.
The application flow is quite simple:
- an Azure Function that exposes some operations on our “smart” devices, like list, get details by id and change status
- a console app with Semantic Kernel
- our LLM deployed on Azure OpenAI
Let’s take a look at the Azure Function first.
I tried to keep things as simple as possible, so for this sample I decided to model all the sensors starting from a common Device class that looks more or less like this:
public abstract record Device
{
    public int Id { get; init; }
    public string Name { get; init; }
}
A light can be turned on and off, so it’s definition can be just:
public record Light : Device
{
    public bool IsOn { get; set; }
}
Similar thing for door sensors:
public record DoorSensor : Device
{
    public bool IsOpen { get; set; }
}
The Function App exposes a bunch of triggers to operate on these models. For example, to update the state of a door sensor, we have to do a POST call to doorsensors/{sensorId:int}/state and pass a boolean value defining the new state.
The trigger will execute this:
[Function(nameof(ChangeDoorSensorState))]
public async Task<IActionResult> ChangeDoorSensorState(
    [HttpTrigger(AuthorizationLevel.Function, "post", Route = "doorsensors/{sensorId:int}/state")] HttpRequestData req,
    int sensorId)
{
    var newState = await req.ReadFromJsonAsync<bool>().ConfigureAwait(false);

    var sensor = _doorSensorsRepository.GetById(sensorId);
    if (sensor is null)
        return new NotFoundResult();

    sensor.IsOpen = newState;

    return new OkObjectResult(sensor);
}
Let’s have a look at the Console App now. This will be our way to “talk” with the Smart Agent.
The first thing we have to do, after having parsed the appsettings, is to setup the Kernel. We start by configuring the OpenAI Chat Completion service:
var credentials = new DefaultAzureCredential();
var kernelBuilder = Kernel.CreateBuilder();
var config = host.Services.GetRequiredService<IConfiguration>();
kernelBuilder.AddAzureOpenAIChatCompletion(
    config["OpenAiModelId"]!,
    endpoint: config["OpenAiEndpoint"]!,
    credentials);
Now we have to configure the Plugins (more on these in a minute):
var lightsPlugin = host.Services.GetRequiredService<LightsPlugin>();
kernelBuilder.Plugins.AddFromObject(lightsPlugin);
var doorSensorsPlugin = host.Services.GetRequiredService<DoorSensorsPlugin>();
kernelBuilder.Plugins.AddFromObject(doorSensorsPlugin);
And finally we can build the Kernel object:
var kernel = kernelBuilder.Build();
As we saw in Part 1, Plugins are normal classes that expose the extra functionalities we want to add. Each method has to be decorated with some attributes that describe in plain english their purpose as clearly as possible. This is necessary to help the LLM understand what the functionality does and decide if call it or not.
Our LightsPlugin is nothing more than a wrapper over an HttpClient that would call the triggers exposed by our Function App.
For example, to retrieve the list of all the lights:
public class LightsPlugin
{
  private readonly HttpClient _httpClient;
  private readonly ILogger<LightsPlugin> _logger;

  public LightsPlugin(HttpClient httpClient, ILogger<LightsPlugin> logger)
  {
      _httpClient = httpClient;
      _logger = logger;
  }

  [KernelFunction("get_lights")]
  [Description("Gets a list of lights and their current state")]
  [return: Description("A collection of lights")]
  public async Task<IEnumerable<Light>> GetLightsAsync()
  {
      _logger.LogInformation("Getting all the lights...");

      var response = await _httpClient.GetAsync("api/lights");
      response.EnsureSuccessStatusCode();
      var lights = await response.Content.ReadFromJsonAsync<IEnumerable<Light>>()
                                          .ConfigureAwait(false);
      return lights ?? Array.Empty<Light>();
  }
}
Now let’s see how we can combine everything and start using the Smart Assistant:
var chatCompletionService = kernel.GetRequiredService<IChatCompletionService>();
OpenAIPromptExecutionSettings openAIPromptExecutionSettings = new()
{
    ToolCallBehavior = ToolCallBehavior.AutoInvokeKernelFunctions
};

var history = new ChatHistory();

while (true)
{
    var question = Console.ReadLine()!.Trim();

    history.AddUserMessage(question);

    var result = await chatCompletionService.GetChatMessageContentAsync(
       history,
       executionSettings: openAIPromptExecutionSettings,
       kernel: kernel);

    history.Add(result);
    Console.WriteLine(result);
}
I’ve stripped out a lot of code just to focus on the core. We start by retrieving the Chat Completion service from the kernel and then we initialize a chat history, which will be used to keep track of the requests we make to the Agent.
At this point we can start reading our input from the terminal (voice control TBD! :D ), appending it to the history and calling the chat service.
The magic trick lies in the openAIPromptExecutionSettings object: it tells the LLM to automatically invoke functions from Plugins in case they match our query.
If we now run our app, we should be able to ask our Smart Assistant to interact with the devices we have available:
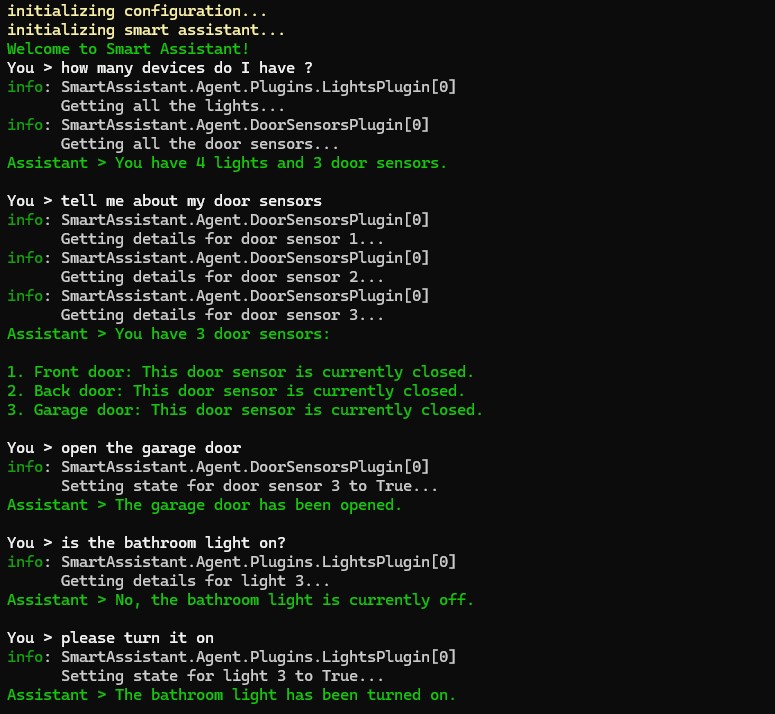
All the code is available on GitHub, have fun!
Did you like this post? Then